软件系统开发中,经常会遇到需要异步执行任务的场景,比如某些事件会触发异步发送邮件,再比如订单30分钟未支付自动取消等等。

那么这种场景,如何处理呢?对于Java等自带多线程的语言,开发者可能第一时间想到的方案就是开启一个新的线程来处理这样的异步任务。但是,线程开启多了,业务复杂了,就出现严重的失控局面。那么有没有更好的处理方案呢?深入一想,这不就是典型的生产和消费模式么,所以可以采用消息队列来完美解决此种场景。比较常见的消息队列系统有MemcacheqRabbitmq

消息队列系统其实就是一个最简单的先进先出队列,队列的一个成员就是一个字符串(多数是用json格式),用来标识要处理的具体任务。但细细一想,消息队列系统也存在蛮多疑问的:

  1. 消息队列只能存储字符串类型的数据,那么如何将一个发送邮件的任务,转换为消息队列中的一个消息呢?
  2. 消息队列只负责消息的存入与取出,本身不能执行任何程序,那么我们要如何从消息队列中一个一个取出,再将这些消息转化回任务并执行呢?
  3. 我们无法预知消息队列何时会有消息进入,所以我们的任务执行程序还需要具备监控消息队列的能力,也就是一个常驻后台的守护进程。
  4. PHP的Web程序都以CGI的方式运行,无法常驻内存。但是PHP还有CLI模式,那么守护进程是否能以PHP-CLI来实现呢?
  5. 守护进程的状态监控如何实现呢?

对于以上问题,我们能否找到已有的轮子呢?熟悉Ruby的程序员可能比较熟悉Resque。它是一个以Redis作为后台消息队列,可以处理多队列的生产和消费模型实现。也正是因为简单出色的实现思路,市场上出现了其他语言的clone版本,比如 php-resquepyresnode-resque。Reque的具体工作流程,见下图:

Resque 流程图

介于目前我手头的项目用的PHP的Yii2框架,所以本篇以php-resque为例,介绍使用方法

安装

前提条件

需要安装和配置Redis,具体可参见 Redis-Yii2

安装步骤

composer.json文件里添加php-resque(处理即时任务)和php-resque-scheduler(处理计划任务)依赖:

1
2
"chrisboulton/php-resque": "dev-master",
"chrisboulton/php-resque-scheduler": "dev-master"

配置

通过上面的流程图,可以看出,这里最主要的是消费者Worker守护进程的启动,由Worker来具体消费队列里的消息,转换为任务Job,进而异步处理。

Worker进程的配置

为了Worker启动方便,我这里将启动脚本写成Yii2的console脚本,如下:

1
2
3
4
5
6
7
8
9
10
11
12
13
14
15
16
17
18
19
20
21
22
23
24
25
26
27
28
29
30
31
32
33
34
35
36
37
38
39
40
41
42
43
44
45
46
47
48
49
50
51
52
53
54
55
56
57
58
59
60
61
62
63
64
65
66
67
68
69
70
71
72
73
74
75
76
77
78
79
80
81
82
83
84
85
86
87
88
89
90
91
92
93
94
95
96
97
98
99
100
101
102
103
104
105
106
107
108
109
110
111
112
113
114
115
<?php

namespace console\controllers;

use common\components\Yii2Resque;
use Psr\Log\LogLevel;
use Resque;
use Resque_Log;
use Resque_Redis;
use Resque_Worker;
use ResqueScheduler_Worker;
use Yii;
use yii\console\Controller;

/**
* Resque控制器,主要用来启动Resque
*
* Class ResqueController
* @package console\controllers
*/
class ResqueController extends Controller
{
/**
* 启动消费 QUEUE_ORDERS 队列的 Worker
*
* ./yii resque/orders >> /var/log/resque/orders.log &
*/
public function actionOrders()
{
$this->startWorkers(Yii2Resque::QUEUE_ORDERS, 3);
}

/**
* 启动消费 QUEUE_EMAIL 队列的 Worker
*
* ./yii resque/email >> /var/log/resque/email.log &
*/
public function actionEmail()
{
$this->startWorkers(Yii2Resque::QUEUE_EMAIL);
}

/**
* 启动计划任务消费的 Worker
*
* ./yii resque/start-schedule >> /var/log/resque/schedule.log &
*/
public function actionStartSchedule()
{
// 设置Redis
$redis = Yii::$app->redis;
$REDIS_BACKEND = "redis://:$redis->password@$redis->hostname:$redis->port";
Resque::setBackend($REDIS_BACKEND);

// 启动计划任务 Worker
$worker = new ResqueScheduler_Worker();
$worker->logLevel = ResqueScheduler_Worker::LOG_NORMAL;
fwrite(STDOUT, "*** Starting scheduler worker\n");
$worker->work(5);
}

/**
* 启动 worker
*
* @param $queue_name string 队列名称
* @param $count integer worker个数,默认1个
* @param $interval integer 间隔秒数,默认5秒
* @param $prefix string Redis命名空间(前缀),默认: resque
*/
private function startWorkers($queue_name, $count = 1, $interval = 5, $prefix = null)
{
// 设置Redis
$redis = Yii::$app->redis;
$REDIS_BACKEND = "redis://:$redis->password@$redis->hostname:$redis->port";
Resque::setBackend($REDIS_BACKEND);

// 设置日志
if (!isset($logger) || !is_object($logger)) {
$logger = new Resque_Log(false);
}

// 设置Redis命名空间前缀,默认:resque
if (!empty($prefix)) {
$logger->log(LogLevel::INFO, 'Prefix set to {prefix}', array('prefix' => $prefix));
Resque_Redis::prefix($prefix);
}

// 启动 Worker
if ($count > 1) {
for ($i = 0; $i < $count; ++$i) {
$pid = Resque::fork();
if ($pid === false || $pid === -1) {
$logger->log(LogLevel::EMERGENCY, 'Could not fork worker {count}', array('count' => $i));
die();
} else if (!$pid) {
// Child, start the worker
$queues = explode(',', $queue_name);
$worker = new Resque_Worker($queues);
$worker->setLogger($logger);
$logger->log(LogLevel::NOTICE, 'Starting worker {worker}', array('worker' => $worker));
$worker->work($interval);
break;
}
}
} else {
// Start a single worker
$queues = explode(',', $queue_name);
$worker = new Resque_Worker($queues);
$worker->setLogger($logger);

$logger->log(LogLevel::NOTICE, 'Starting worker {worker}', array('worker' => $worker));
$worker->work($interval);
}
}
}

Yii2的配置

为了方便Yii2 Web应用程序生产Job,我这里将生产Job的方法封装为一个Component,具体代码见如下

1
2
3
4
5
6
7
8
9
10
11
12
13
14
15
16
17
18
19
20
21
22
23
24
25
26
27
28
29
30
31
32
33
34
35
36
37
38
39
40
41
42
43
44
45
46
47
48
49
50
51
52
53
54
55
56
57
58
59
60
61
62
63
64
65
66
67
68
69
70
71
72
73
74
75
76
77
78
79
80
81
82
83
84
85
86
87
88
89
90
91
92
93
94
95
96
97
98
99
100
101
102
103
104
105
106
107
108
<?php

namespace common\components;

use Resque;
use Resque_Job_Status;
use ResqueScheduler;
use Yii;
use yii\base\Component;

/**
* Resque组件
*
* Class Yii2Resque
* @package common\components
*/
class Yii2Resque extends Component
{
const QUEUE_ORDERS = "orders"; //订单队列,用来处理订单相关的任务
const QUEUE_EMAIL = "email"; //邮件队列,用来处理邮件相关的任务

public function init()
{
parent::init();

$redis = Yii::$app->redis;
Resque::setBackend("redis://:$redis->password@$redis->hostname:$redis->port");
}

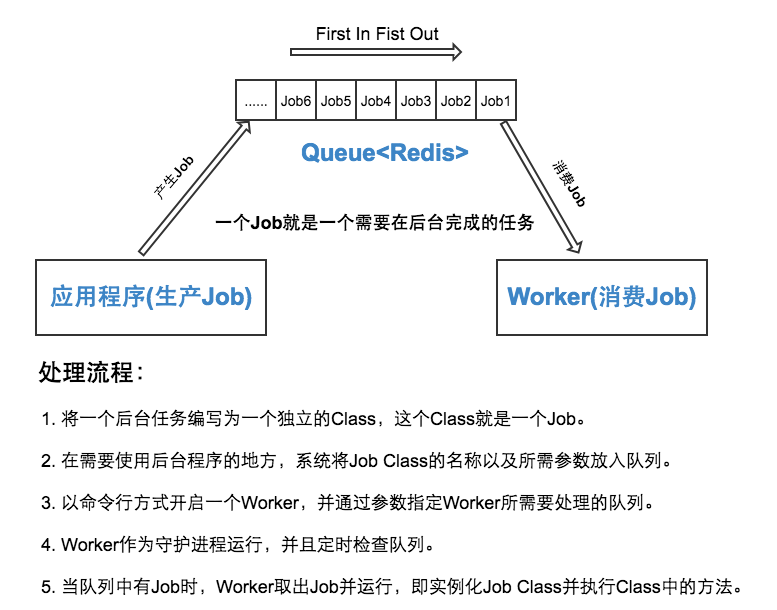
/**
* Create a new job and save it to the specified queue.
*
* @param string $queue The name of the queue to place the job in.
* @param string $class The name of the class that contains the code to execute the job.
* @param array $args Any optional arguments that should be passed when the job is executed.
*
* @return string
*/
public function createJob($queue, $class, $args = array(), $track_status = false)
{

return Resque::enqueue($queue, $class, $args, $track_status);
}
/**
* Create a new scheduled job and save it to the specified queue.
*
* @param int $in Second count down to job.
* @param string $queue The name of the queue to place the job in.
* @param string $class The name of the class that contains the code to execute the job.
* @param array $args Any optional arguments that should be passed when the job is executed.
*/
public function enqueueJobIn($in, $queue, $class, $args = array())
{
ResqueScheduler::enqueueIn($in, $queue, $class, $args);
}
/**
* Create a new scheduled job and save it to the specified queue.
*
* @param timestamp $at UNIX timestamp when job should be executed.
* @param string $queue The name of the queue to place the job in.
* @param string $class The name of the class that contains the code to execute the job.
* @param array $args Any optional arguments that should be passed when the job is executed.
*/
public function enqueueJobAt($at, $queue, $class, $args = array())
{

ResqueScheduler::enqueueAt($at, $queue, $class, $args);
}
/**
* Get delayed jobs count
*
* @return int
*/
public function getDelayedJobsCount()
{
return (int)Resque::redis()->zcard('delayed_queue_schedule');
}
/**
* Check job status
*
* @param string $token Job token ID
*
* @return string Job Status
*/
public function status($token)
{
$status = new Resque_Job_Status($token);
return $status->get();
}
/**
* Return Redis
*
* @return object Redis instance
*/
public function redis()
{
return Resque::redis();
}
/**
* Get queues
*
* @return object Redis instance
*/
public function getQueues()
{
return $this->redis()->zRange('delayed_queue_schedule', 0, -1);
}
}

测试

首先启动 Worker守护进程(这里以orders队列为例)

注意在这之前,需要保证你Redis处于正常启动状态

1
2
3
$ cd /path/to/yii2-project-root
$ ./yii resque/orders >> /var/log/resque/orders.log &
$ ./yii resque/start-schedule >> /var/log/resque/schedule.log &

为了演示,我们可以通过日志来观察

1
$ tail -f /var/log/resque/*.log

生产Job,观察日志输出

创建对象

1
2
3
4
5
6
7
8
9
10
11
12
13
14
15
16
17
18
19
20
21
22
23
24
25
26
27
28
29
30
31
32
33
34
35
36
<?php

namespace console\jobs;

use yii\helpers\ArrayHelper;

/**
* 处理订单的异步任务
*
* Class OrderJob
* @package console\jobs
*/
class OrderJob
{
/**
* 执行任务的前置条件
*/
public function setUp()
{
dump("===> 这里放一些任务执行之前需要处理的逻辑代码");
}

public function perform()
{
dump("这里可以接受参数的哦,比方说我们取一下order_id:" . ArrayHelper::getValue($this->args, 'id'));
dump("这里是具体的处理订单的逻辑代码");
}

/**
* 执行任务的后置条件
*/
public function tearDown()
{
dump("===> 这里放一些任务处理之后需要处理的逻辑代码");
}
}

生产一个即使处理的任务(可通过Yii2的命令行脚本来测试)

1. 创建一个/console/controllers/TestController.php
1
2
3
4
5
6
7
/**
* 测试需要即时消费的订单任务
*/
public function actionOrder()
{
Yii::$app->resque->createJob(Yii2Resque::QUEUE_ORDERS, OrderJob::class, ["id" => 100]);
}
2. 将OrderJob放入队列
1
2
$ cd /path/to/yii2-project-root
$ ./yii test/order
3. 观察日志输出,检测OrderJob是否被消费
1
2
3
4
5
6
7
==> /var/log/resque/orders.log <==
[notice] Starting work on (Job{orders} | ID: 28974156fc5ae0fcfa6e64b9c50dae76 | console\jobs\OrderJob | [{"id":100}])
"===> 这里放一些任务执行之前需要处理的逻辑代码"
"这里可以接受参数的哦,比方说我们取一下order_id:100"
"这里是具体的处理订单的逻辑代码"
"===> 这里放一些任务处理之后需要处理的逻辑代码"
[notice] (Job{orders} | ID: 28974156fc5ae0fcfa6e64b9c50dae76 | console\jobs\OrderJob | [{"id":100}]) has finished

生产一个延时处理的任务(可通过Yii2的命令行脚本来测试)

1
2
3
4
5
6
7
/**
* 测试需要延时消费的订单任务
*/
public function actionDelayOrder()
{
Yii::$app->resque->enqueueJobIn(10, Yii2Resque::QUEUE_ORDERS, OrderJob::class, ["id" => 666]); //延迟10s执行
}
2. 将OrderJob放入队列
1
2
$ cd /path/to/yii2-project-root
$ ./yii test/delay-order
3. 观察日志输出,检测OrderJob是否被消费
1
2
3
4
5
6
7
8
9
10
==> /var/log/resque/schedule.log <==
*** queueing console\jobs\OrderJob in orders [delayed]

==> /var/log/resque/orders.log <==
[notice] Starting work on (Job{orders} | ID: 6066ab9cc46c5452c86ea470413e4f78 | console\jobs\OrderJob | [{"id":666}])
"===> 这里放一些任务执行之前需要处理的逻辑代码"
"这里可以接受参数的哦,比方说我们取一下order_id:666"
"这里是具体的处理订单的逻辑代码"
"===> 这里放一些任务处理之后需要处理的逻辑代码"
[notice] (Job{orders} | ID: 6066ab9cc46c5452c86ea470413e4f78 | console\jobs\OrderJob | [{"id":666}]) has finished